Romanesque Binding
- Fenna Engelke
- Jan 13, 2020
- 8 min read
Updated: Aug 24, 2022
(Please note this post is still under construction and is not complete.)
This month we have been working on creating a Romanesque binding model.
We had prepared a bit beforehand by folding the quires and creating endband cores out of parchment strips. Normally, the quires would be made of parchment, but due to cost, we used paper for the book block. We had been given sheets with a copy of the Art of Book Binding A Practical Treatise by Joseph W. Zaehnsdorf, the 1903 edition printed onto them. These paged were placed in order and folded into quires of four bifolios. The final endleaf was parchment, with the rest of the bookblock being paper.
Monday, January 6th - Sewing
The first day was spent on sewing the quires together using a thick linen cord. The supports used were made of alum tawed leather which had a slit cut in the middle so they could be sewn through. Each quire sewn was ended by being wound around the parchment core we had made. The endbands on romanesque bindings serve a structural purpose, as opposed to later and more modern books where endbands have taken a purely decorative purpose.


Images: () The textblock, sewn, photo and book by Godelieva van der Randen
Tuesday and Wednesday, January 7th and 8th - Wooden Boards
These days were spent in the Wood and Furniture department's studio as we created wooden boards for our books. Book boards were traditionally made out of beech or oak or sometimes pine wood. The boards we used for this project are made of oak. We chose our boards and measured out the size of our bookblock onto the panels. We took our boards to the band saw to cut them to size. We made out boards a little large so that we could cut them down more later, in case of any mistakes. However, I recommend just cutting them to size the first time as the extra cutting added some extra work and, in the case where your board is somehow off square, you can always adjust the attachment of the board to the book with the book supports.


After cutting the boards to size, we had to decide which side of each board would be facing the bookblock and which would be our outer covers.
This was easy since one side of my board had a nice hole in it which I had face the inside of the back of my board. The inner edge of the boards facing the spine was planed down into a curve.
Along this curved edge, we marked where the alum tawed leather supports would fall onto the board. We used this to then mark where they would enter the curved edge of the board. On the inside of the boards we marked where the straps would come out and how far into the boards they would sit. The holes along the edge of the boards were started by drilling small holes, about 2 mm apart within the area we wanted them. We made sure that these holes when deep enough into the boards that they met the lines we had marked for where the supports would exit the boards.
We started by using a chisel to mark and cut the area on the inside of the boards where the supports would sit in the board. After that, we proceeded to carve out the holes we had made along the edge of the boards, large enough for the leather supports to fit through.
Another series of holes was created at the end of the chiseled incisions and hollowed out enough for the leather to fit through.


Since we had originally made the boards slightly too large, I had to go back and cut the boards down a second time to make them square with the bookblock. It's not until late romanesque and gothic bindings that one finds the cover larger than the bookblock.
Once it was cut to size, all the edges were slightly planed so that there were not harsh board edges.
The spine-facing corners of the boards were chiseled diagonally and then were drilled. The drilled holes started on the now planed corners and when diagonally into the board, coming out on the inside of the covers. This hole is for the parchment endband cores to go through. (See image -)
Once the leather was laced through the boards, they needed to be held in place, this was done with a triangular wooden pin which was hammered into place next to the leather strips. The part of the wooden pin which stuck out was sawed down and made to be plain with the boards, while the remains of the alum tawed leather was also cut to be even with the boards.
Thursday, January 9th - Dying Leather


Thursday was spent on any catch-up that was needed on the boards and then dying of our leather. Historically, romanesque bindings would have had leather which was a yellow-ish brown color.
I tested a few colors on a cut-off of leather before deciding on a dark brown. The leather dyes used were from the brand Eukesolar, though we also had a yellow dye which was from Stahl. We created somewhere around 160-180 ml of dye color to used on our leathers. I ended up making around 178 ml of dye. Note that I wore gloves for both the mixing and the application process.
The proportions of the dye I used are listed to the side. The original sample I made used 2 ml of the Eukesolar Geel but due to the fact that we did not have much of this dye, I ended up switching to the Stahl yellow which we had more of within storage.
I applied my dye at first by using a paper towel before switching to a linen cloth. Some students also used sponges to apply their dyes. The leather required a few passes of application to get a completed even color. I ended up not needing to used the entire amount of dye that I created, and had about half the bottle left over once I was done. The leather was left over the weekend to dry.
Monday and Tuesday, January 13th and 14th - Endbands and Applying Leather
These two days were all about putting our leather onto our books and getting our endbands sewn. In respect to endbands, there were a few options for us to choose from and some options required sewing before the leather application.
We had three endband options to choose from:
1. Sewing a chevron endband on the primary band, and then later adding a leather tab to the book tabs.
2. Leaving the primary endband, but still adding a leather tab, leaving the primary endband visible.
3. Applying the leather, and then sewing the chevron endband onto the primary and into the leather.
I ended up choosing the third option, mostly due to time constrains, as I had not taken my book home to create the chevron pattern on the primary core over the weekend. If I was going to create a tab for my book, I would have preferred to cover the primary endband that I had made during the book binding since I felt my primary endbands weren't very pretty. I should note that the third endband option, sewing into the leather, is a later style of endband, which is seem more in the 16th century.
Before using the leather we had dyed, the leather needed to be 'worked' so that leather would be supple and not stiff. The dyes and alcohol used can also dry out the leather, making it stiff. For this reason, the leather needs to be folded and rolled to make it flexible again. I was lucky in this respect, as my leather had not stiffened as much as other leathers.


Our bookblocks were wrapped in plastic wrap for the next few steps to protect the paper. It was then placed with the spine-up in a bookbinding table press.
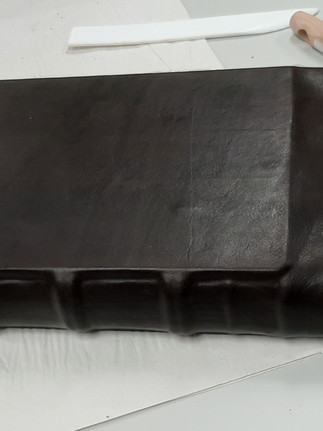
The leather was first humidified with water and a sponge; more water placed on the hair side than the flesh side.
The leather was then stretched and molded over the spine of the book. Once an impression of the book spine had been made in the center of the leather, the flesh side of the leather was given a layer of watered down starch paste. I also went over the hair side of the leather with a water filled sponge before stretching the leather over the book once more, this time trying to get a better impression. The leather was give another layer of thin starch and then left under mylar to sit for 15 minute. After the 15 minutes were up, a bone folder was used to scrap off the paste sitting in the leather. A thicker starch paste was now used. The plastic wrap was removed from the book and thick starch paste was applied to the spine as well as the the flesh side of the leather. The leather was then stretched across the spine of the book once more and tooled into place using a bone folder. Once the spine was secure, the leather was stretched over the boards and folded over the for-edge of the covers.


When satisfied with the adherence and stretch of the leather, attention can be turned to the turn-ins. The leather was cut where it overlapped the spine (see image -) so that the turn-ins were possible.
I admit my turn-ins were quite roughly done, partially due to time constraints (the day was ending and I wanted to have it finished before the building closed) and partially because it wasn't uncommon to see some rough turn-ins for the time period. We had the option of pasting them down or sewing them. I ended up pasting them down to save on time but some of my classmates sewed their turn-ins as well. Once done, the book was placed back in the press and cord was used to tightly bind around the raised sewing support to help define them. This was left over night to dry.
The next day we were able to take the books out of the press. The leather along the spine could be cut down and the endbands were sewn, sewing the chevron endband onto the primary endband and into the leather.


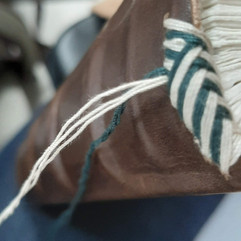


Images: (-) Progress of sewing the cheveron endbands, a more 16th century style.
Wednesday, January 15th - Parchment Fenestra


This day was spent on creating a parchment fenestra. The fenestra would be made with a parchment title, written on with iron-gal ink, and then given a transparent parchment piece to over the title.
We had a few scripts we could choose from but I chose an uncial script over the proto-gothic on. After practicing on paper, I moved on to parchment and used a steel nib pen and some iron gal ink which I had made with my class last year.
Monday and Tuesday, January 20th and 21st - Metal Furnishings


Monday and Tuesday was spent in the Metals department creating the furnishings for our book covers, including the fenestra and the clasps. We were given brass to work with and allowed to design the furnishings as we liked.
Along with sawing our pieces into the correct shapes, we also created a brass peg which acted as a latch for the book strap. All brass pieces had holes drilled through and were attached to the bookboard by hammering nails through them.
Reference
Bibliothèque nationale. (France). 1989. Les tranchefiles brodées: étude historique et technique. Paris: Bibliothèque nationale.
Greenfield, Jane, and Jenny Hille. 1986. Headbands: how to work them. New Castle, Del: Oak Knoll Books.
Comments