Making a Karibari
- Fenna Engelke
- Aug 15, 2022
- 9 min read
Updated: Sep 26, 2022
(This post is still under construction)
As a part of my internship with the Smithsonian's National Asian Art Museum, I was able to create a karibari alongside my fellow interns and mentors. A karibari board is a Japanese drying board, used to simultaneously dry and flatten paper, silk, or layered east asian mounted paintings. A karibari consists of a wooden lattice made from a soft wood, often cedar, and covered with several layers of paper and paste. The number of layers can vary depending on the studio that makes the drying board but we ended up with 8 paper layers. The process to apply the various paper layers took two weeks, and a third week was used to apply layers of persimmon juice to the exterior of the drying board. The following post covers the process that we used in creating a karibari over the course of those three weeks. The outlined sections are as follows [1]:
The cedar wood lattice
The first layer, honeshibari ⸢骨縛り⸥
The second layer, dobari ⸢胴張り⸥
The third layer, minokake/minobari ⸢蓑掛け/蓑張り⸥
The fourth layer, minoshibari ⸢蓑縛り⸥
Shaving the edges, mimisuki ⸢耳すき⸥
The fifth layer, uke/ukebari ⸢浮け / 浮け張り⸥
The sixth layer, uke/ukebari ⸢浮け / 浮け張り⸥
The seventh layer, ukeshibari ⸢浮け縛り⸥
The eighth layer, ukeshibari ⸢浮け縛り⸥
Persimmon juice, kakishibu ⸢柿渋⸥
Seaming paper and preparing for the minokake layer
Acknowledgments
Footnotes
Image References
Bibliography
In my descriptions, I try to provide information about the papers we used; however, some papers were purchased some time ago and so I can only provide some information. When making a karibari, it is not necessary to match the exact same papers we use here, rather it is better to look for papers of appropriate fiber (kozo/paper mulberry papers) and thickness. Speaking to my mentors, the ideal kozo paper to use are ones that have had soda ash used in their production, at the very least. Papers made with caustic soda are not recommended. [2, 3]
The cedar wood lattice


In our case, the core of our karibari was a cedar lattice from an old frame/mounting board. The lattice was still covered in old layered paper and so the old paper and paste were removed from the lattice with applications of water and by peeling or scraping the paper remains off with a bamboo spatula.
Cedar lattices can be expensive and difficult to find in western institutions so a possible alternative is to instead use a honeycomb board as a core. I personally have not made one with this board as an alternative lattice but was told it is possible and that if one uses a honeycomb board, it is better to then start with the minokake layer and skip the honeshibari and dobari layers. [4]
The first layer, honeshibari ⸢骨縛り⸥
The first layer applied to the wooden lattice is called the honeshibari. This layer is made using hosokawa-shi paper, which uses a paper that is around 6 momme [5] thickness.


The cedar frame has a thick paste applied to it, sometimes needing to be reapplied to combat the paste drying too quickly or the wood taking in the paste. The paper was applied in full sheets. Due to the size of the karibari, this meant that the it took two and a half sheets to cover one side of the board. The sheets overlapped about 2-3 inches.
The process is then repeated on the back side of the board and, once dry, the parts of the paper that overlaps over the edges are trimmed down.
The second layer, dobari ⸢胴張り⸥


The second layer, dobari ⸢胴張り⸥, is done with a sekishu paper with a 4-5 momme thickness. In Koyano's guild, she uses the term honeshibetabari for this layer, which appears in the diagram. [6] The sheets are square shaped with cut edges. The paper, when placed onto the drying board with a thin paste, should only slightly overlap onto the outer frame of the lattice about 1cm and does not reach the very edge of the board. Subsequent papers have an overlap of about 0.5-1 inch.
Koyano's illustration in Image 12 shows the placement in relation to the first layer.
The third layer, minokake/minobari ⸢蓑掛け/蓑張り⸥
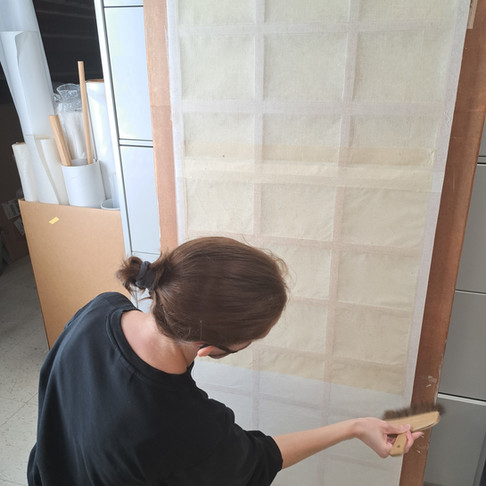
Images: (16-19) Fenna Engelke and Tammy Hong applying the minokake layer,
(20) The karibari drying after the minokake layer is applied.


The minokake/minobari ⸢蓑掛け/蓑張り⸥ [4] is the first 'floating' layer seen in the process. By 'floating' I mean that there are a few layers within the karibari that are not completely adhered with paste to the rest of the layers. These floating layers create pockets of air within the karibari which assist in the regulation of moisture within the structure.
This step required some preparation as we had taken time before the karibari project to create two rolls of seamed paper for the 3rd layer specifically. For notes on preparing the seamed paper rolls for the minokake layer, see the bottom of the post for a specific section on that topic. The paper we used ended up being a kozo paper from the first half of the 20 century, likely bought from somewhere in the Tokyo area. Traditionally, the paper used for the minokake layer was taken from recycled materials like old books and it is not uncommon to see recycled Japanese papers used in the layers of karibari boards and folding screens (See Images - at the bottom of the post for examples).
Images: (21) A small gif about the application of the minokake layer.

The roll of paper is applied in layers of thirds. Thick paste is applied to the outer wood frame and the horizontal inner lattice. By the end of the application, the entire area will have three layers of minokake paper layered with pockets of air in between.
The fourth layer, minoshibari ⸢蓑縛り⸥


In the fourth layer, a sekishu paper is used. The paper is pasted out with a thin water paste while the outer frame of the karibari has a thicker paste applied. Unlike the second layer, the minoshibari paper is applied to the very edge of the frame, covering the entirety of the front and back of the board. The subsequent sheets have a 2.5 to 3 inch overlap.
Because of the air pockets created by the minokake layer, the way one brushes the minoshibari layer onto the board is slightly different than before (See Image 26). Once applied, use the back of your nails to flatten out any small wrinkles or creases on the paper.
Shaving the edges, mimisuki ⸢耳すき⸥
This step is more important for folding screens (the process for making a karibari drying board and making the panels for a folding screen are very similar) in order to reduce the bulk along the edges of the screens, therefor removing some physical tension when screens are later hinged together and folded along their edges. For the karibari, it is done more so to round the edges and make a more appealing drying board. The paper along the edges is paired down using a deba-bōchō ⸢出刃包丁⸥, a Japanese cooking knife usually used for fish and meat, but could theoretically be done with another type of appropriately shaped and sharp knife.
We ended up planing the wood along the edges of the frame as well to give it a nicer curve to the edges but this was more a matter of personal preference rather than a necessary step.


Images: (27) Melina Edic shaving or pairing the paper along the edges of the karibari (28-30) Fenna Engelke planing the edges of the karibari
The fifth layer, uke/ukebari ⸢浮け / 浮け張り⸥


There are two uke layers, which is why the uke/ukebari layer is mentioned twice. These layers are both floating layers. Similar to the third layer, the minokake layer, these layers will create pockets of air within the drying board. For both ukebari layers, a Yame paper is used; this is a kozo paper of 2.16 momme.[]
For the first uke layer, two sheet sizes are needed. These sizes are pasted out and applied in a brick-work style, overlapping by several inches. When pasted out, the sheets are first brushed lightly with a water brush before pasting out only the edges of the paper. This ares of no paste in the center of these sheets creates the air pockets needed for the karibari to work.
The sixth layer, uke/ukebari ⸢浮け / 浮け張り⸥
The sixth layer, as noted, is also a floating layer but the sheets are cut into different dimensions and placed differently from the fifth layer. The paper is cut into two sizes,... These sheets have two cut edges and two feathered edges. The cut edges are pasted out altogether, by stacking them slightly apart and pasting all the cut edges in one go (see image -). Then the feathered edges are individually pasted out before they are applied to the board.


Images: () melina; fenna pasting out the edges of the papers in preparation for application () Tammy Hong pasting out the half sheets () image credit Melina Edic () and Tammy Hong, Fenna Engelke applying part of the sixth layer () Melina, the completed sixth layer
The seventh layer, ukeshibari ⸢浮け縛り⸥
For our karibari, we applied two ukeshibari layers. Sekishu paper was used for both layers. For the seventh layer, three edges of the paper are cut and one edge is given a feathered edge. There are two sizes of sheets, a square sheet and a smaller rectangular sheet, about half the size of the larger sheets. Both sizes of paper are the width of the drying board. The smaller of the sheets will be used to the top and bottom of both sides of the karibari. The papers are always placed with the feathered edge pointing downwards. When placing subsequent sheets, there is a 2-3 inch overlap between them.


Images: () graphic of the paper sheets used for the seventh layer. Three sides are cut edges while one is a feather cut edge. (-) Melina Edic () and Tammy Hong () pasting out the papers for the seventh layer (fenna). () Fenna Engelke pasting out paper for the seventh layer (tammy) () The karibari after the seventh layer (tammy)
The eighth layer, ukeshibari ⸢浮け縛り⸥
The sekishu paper is cut so that all four edges have feathered edges. The paper is pasted out with a thin water paste and applied to the board, each subsequent sheet overlapping about 2 inches over the previous one. The sheet is large enough to go over the edges of the frame and should be applied so that the amount of paper going over the edges is equal on both side. After the sheet is brushed out onto the board, the extra paper on the edges is folded over the edge and adhered to the sides of the karibari frame.


Images: () Fenna Engelke pasting out a sheet of paper for the eighth layer with a thin water paste, credit tammy () Fenna Engelke applying the eighth layer (credit melina) () Akiko Niwa, using tweezers to make sure that any of the feathered edge of the paper did not fold over onto itself during application. (fenna) () The karibari after the eighth layer (credit melina)
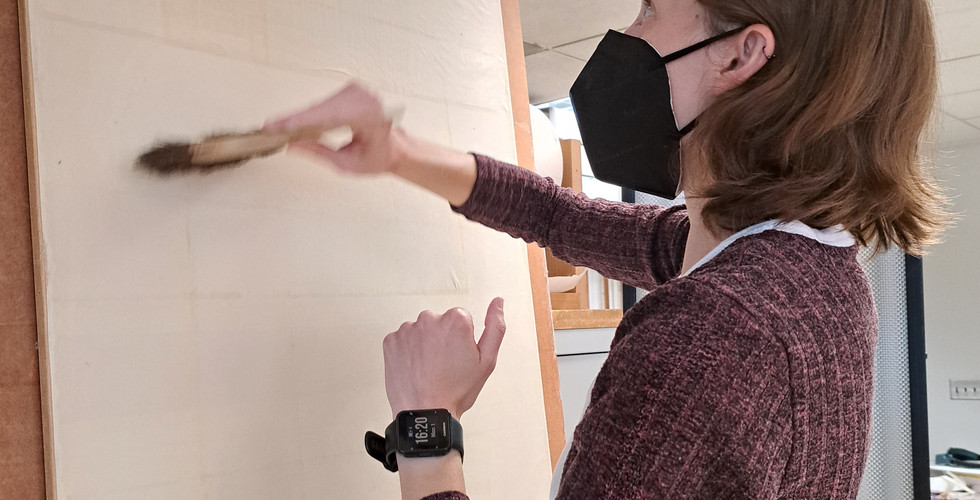
Persimmon Juice, Kakishibu ⸢柿渋⸥ Once the paper layers are complete and dried, fermented persimmon juice (kakishibu ⸢柿渋⸥) is applied to the surface of the paper. This process is done several times, drying between each application, until the karibari board is a dark brown or plum color. In our case, we applied the fermented persimmon juice 5 times before determining that it was complete. [] The persimmon juice acts to repel water, though it does allow movement of water vapor. [] Once the ideal amount of persimmon juice is applied, the board is left to dry. A few weeks after the application, the board is washed in order to remove any excess juice which, if not washed, may stain the papers that are attached to the board for drying. []


Images: () Applying the first layer of kakishibu. Fenna applies the juice while Tammy Hong, Melina Edic, and Jiro Ueda watch on. (akiko credit) () Tammy Hong applied the second coat of kakishibu while Fenna Engelke watches (akiko credit) () Intern Tammy Hong applying the second layer of persimmon juice (Fenna) () The karibari after second coating (Fenna) () Fenna applying a layer of the 5th coating (tammy credt) () Tammy Hong and Fenna Engelke standing next to the karibari after applying the 5th and last coat of kakishibu (Akiko credit) () (From left to right) Fenna Engelke, Melina Edic, and Tammy Hong sit in front of the completed and dried karibari which has been signed on the edge by all three interns. (Akiko Credit)
Paper Seaming and Preparing for the Minokake ⸢蓑掛け⸥ Layer


Images: Image credit to Akiko Niwa (-) pasting out the edges of the papers () seaming the papers together and going over it with the back of the nails () Tammy Hong and Fenna Engelke seaming paper rolls. (-) Recycled materials from old accounting books. Typically, these materials would be repurposed and used for the inner layers of a karibari or folding screen.
Acknowledgments
A great thank you to my mentors at the National Museum of Asian Art (Andrew Hare, Jiro Ueda, Akiko Niwa) for allowing me the chance to intern with you all and for the chance to create a karibari from start to finish. Another great thank you to my fellow interns who worked alongside me on this group project, Tammy Hong (WUDPAC) and Melina Edic (2022 NMAA CIBA intern).
Footnotes
Image References
Bibliography
Comments